Sunday, April 29, 2012

Sail Away Tote


So, this weekend I finished my first commissioned project.  I completely designed this tote to my customers specifications.   I ended up calling it Sail Away.  It looks so inviting to grab your suit and set out on a yacht.  (If Only)  And I finished it with plenty of time to get it off by Wednesday.  I always seem to work better with a deadline.

She wanted ample room for three beach towels and other essentials to take to the pool.  She also wanted a tote that was washable and would not look to dirty after a use or two.  I just love the blues.


My favorite thing to do is to make the bags I create completely reversible and this is no different.  The upper pic is of the inside pockets.

This is the other side of the interior of the tote.  It has three more Velcro pockets, a key clip and a large zippered pocket.  This was the first time I tried an inside zipper.  I used the directions at Creative Little Daisy.  It was not as near difficult as expected to add an interior pocket.  Her directions and pictures were so precise that it was easy-peasy.  I hope that she loves her new pool tote.  I  hated seeing it leave.  I will have to work on one for myself.  I linked up to....


Fresh Poppy Design


April Finishes

Lily's Quilts
Ellison Lane Quilts Pin It Now!

Friday, April 27, 2012

Crocheted Body Poufs

So, it is the norm at our house.  If you make something for one, you might as well make the same thing for all.  I still have yet to finish the flower pouf, but I came up with this little pattern for the circle pouf.  It can work for guy or gal.  I once again used the Lily Sugar'n Cream Scrubby thread only this time in yellow.  The thread is 100% cotton and seems to hold up well with regular washing.  Really simple pattern to do and takes the whole skein of thread to make the two poufs.  Total cost was about $2 for the two of them.


I thought that I would also share a little bit of spring from my garden.  Have a great weekend!


You can see this and other April Finishes at


April Finishes
Pin It Now!

Tuesday, April 24, 2012

W.I.P Wednesday

So last week, I got a huge load of projects completed.  This week not so much.  The table runner is setting in a clear tote waiting patiently to be put together.  Like I said, my mom will end up getting it on Father's day.  But, I am quite excited to get my first little commissioned project.  Yes, it is just a relative, but you have to start somewhere.  I am working on a canvas bag for taking to the pool.  It has to hold three beach towels and have ample pockets.  I picked up this washable and dryer safe material up at my local JoAnn's.

I choose two gender neutral fabrics so guy or gal could pick it up.  And so a certain husband would be okay carrying it around the pool.  I can't wait to get started on designing it.

I also started this cute little flower scrubby that girl munchkin wanted.  It needs a leaf crocheted on it, but they were completely out of the green Lily Scrubby thread.  I will show you the almost finished product later in the week.


W.I.P. - Canvas tote, Pin Wheel Table Runner and flower scrubby

Completed:  Some much need mending on some jeans
Pin It Now!

Monday, April 23, 2012

Crocheted Pot Holders


I finished a couple pot holders this week.  The square pot holders are a pattern my mom has came up with and the cute little flower pattern is from  Lily's Sugar'n Cream website.  They have a variety of crochet and knitting patterns that are FREE!   You just have to set up an account and they have access to over 250 patterns.  A pretty good deal.  All of the above were crocheted with Sugar'n Cream cotton.  I love to use this on pot holders.  They are so durable and withstand the oven heat.  Lily makes a lot of bright colors that I enjoy to use on a variety of projects.  And no they don't pay me to say nice things. (I only wished).  The cost for all was about $3, when I buy the thread on sale.  I linked up with....

April Finishes


Pin It Now!

Saturday, April 21, 2012

Changing Pad & Diaper Pouch

As you might have read in an early post, I have a Baby Shower today.  I love Baby Showers and looking at the itty bitty clothes and the beaming mother-to-be.  I love anything handmade.  You know that that person took the time to make you a personal gift.  So, I made the Mom-to-Be, a camo blanket, an easy dressed up changing pad and this adorable little Diaper Pouch that I got the tutorial from Noodlehead.  She has some of the cutest little ideas.  The diaper pouch took me about an hour or less. I think after you run through the pattern once, it shouldn't take near as long.
Then I made a really easy changing pad. I took a changing pad that I purchased from my local Target. Sewed some polka dot material on and a strap and Velcro on for closure. 
The diaper pouch hold 5 diapers and a carry along wet-one container.


Here the changing pad is unfolded.


They work great apart


or you can sandwich the diaper pouch in between the changing pad.
Total cost was about $7.00
Check this out and other great projects on......


toastie studio

Sew ChattyApril Finishes

Pin It Now!

Thursday, April 19, 2012

Nursing Cover-up

I have a Baby Shower coming up this weekend and the Mom, whose Baby Shower that is fast approaching, registered for a Nursing Cover-up and I thought I would check it out.   I looked the cover-up up on her registry on the Internet.  They wanted $40, for a yard of material, some D-rings and boning.  There is no way I would spend that much on something I can make for a lot less.  So I started searching on the Internet and found this tutorial on Sew4Home.  I basically used their dimensions, but I didn't want two layers of material on top of the baby.  So I opted for a single piece of cotton material, turned under and finished off.  This is how it turned out.....


The total cost was around $9.00.  You could save on the $9 and buy a little cheaper fabric, but I already had this at home and thought that it would work great.  The rings were $1 and so was the boning.

You can check this out and other great projects on

April Finishes
Pin It Now!

Tuesday, April 17, 2012

Pinwheel Table Runner

So this is what I am hoping to finish in the next week.  I hope that I can finish it.

I am trying to get ahead of the season and finish this for Mother's Day.  I hope my mother doesn't look until after May.  If you are looking, I hope you like it.
I have finished
a camo fleece baby blanket,
 2 potholders,
a nursing cover,
a changing pad and diaper pouch
and a beach bag.

I am linking up with

WIP Wednesday at Freshly Pieced

Come on over and check out all the great Works In Progress!
Pin It Now!

Monday, April 16, 2012

LEGO® Storage Bricks


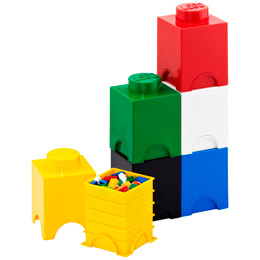
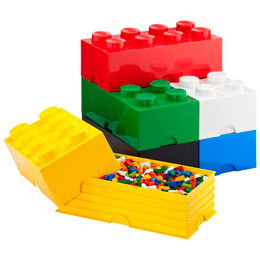
My munchkin got two of these storage containers recently.  We have the smaller containers.  They seem to be well constructed and they are not only great for the smaller pieces, but they also make really great towers.  They are a little on the pricey side, but they stack well and are thicker than a tote.   They come in a variety of sizes from the small (pictured above) to the X-large.  You can see all the LEGO® themed storage containers at The Container Store.


  I will update you on how they hold up.
Pin It Now!

Sunday, April 15, 2012

Camo Fleece Baby Blanket

Well one more finish for the month of April.  I have a Baby Shower next week, so I have a few more things that I have to get finished before then.  Around my house, camo is the new black.  I am not as crazy about it as the rest of my family, but anything in this pink is pretty cute.  I had some left over and I thought this fleece would make a great little baby blanket.


April Finishes
Pin It Now!

Saturday, April 14, 2012

Bird Nest Cupcakes

So, I have been married for over a decade and I have to admit that before Easter Sunday I had never made a cake from scratch. (That I can recall)  I know pretty pathetic.  What can I say.  Anyway, I thought that I would try out a recipe for Bird's Nest Cupcake on the Better Homes and Gardens site.  They were quite delicious.  I might have to try it again sometime.  The recipe had a small hint of lemon and the recipe made 27 cupcakes.  Thought I would just make your mouth water a bit.
I also made some little chocolate nests with Chocolate Almond Bark.  A favorite of mine and the munchkins!

Are you hungry yet?


Tip Junkie handmade projects
Pin It Now!
Friday, April 13, 2012

Beach Bag Baby!

My cousin made one of my munchkins a cute little bag to carry their clothes or wet towel in after hitting the pool or beach.   It is made from a beach towel. I thought that it was super cute! 
Pin It Now!

Wednesday, April 11, 2012

Small Blog Meet and Aurifil Giveaway

Lily's Quilts

I linked up at Lily's Quilts.  She is nice enough to throw little parties for all the small blogs that one day hope to be big.  Come check out the others who have joined and show them a little love.  Maybe even find one to follow.  She is also hosting a competitive giveaway from Aurifil Thread on Flickr.   You get to choose your favorite 12 threads, either with inspiration or without.  Here is what I came up with so far.

 Both pictures I took myself.  The top pic is taken on the eastern plains.  The tulips are in my yard.  I just love spring flowers.

Pin It Now!

Monday, April 9, 2012

Chicken Bacon Ranch Pizza

I recently bought a BBQ Pizza Pan and it had a recipe for pizza, of course.  I decided to test it out last night and it was really good, so I thought I would share. 
  • 2 cups diced cooked chicken (or can of chicken, drained)
  • 1/2 cup ranch dressing
  • 1 clove of garlic
  • 1/4 teas. salt and coarsely ground black pepper
  • Cornmeal for dusting
  • 16 oz. frozen prepared pizza dough, thawed (or whichever you prefer)
  • 2 small vine-ripened tomatoes, seeded and diced
  • 1 cup shredded Colby and Monterey Jack
  • 5 sliced bacon, cooked, drained and crumbled
  • 2 thinly sliced green onions
    Instead of bar-b-quing the pizza, I opted for the oven at 350 degrees.  Combine the chicken, dressing, garlic, salt and pepper in a bowl; toss to coat.  Sprinkle counter with cornmeal, place dough onto cornmeal and roll into a circle the size of you pan.  Mine is just 12 inches.  Place the rolled dough onto the pan, gently stretch to cover the bottom of the pan.  Top the crust with the chicken mixture and tomatoes.  Then sprinkle evenly with cheese and bacon.  Bake for 18-22 minutes or until golden brown.  Sprinkle with the green onions.  It is sooooo good.


Pin It Now!

Saturday, April 7, 2012

Homemade Grape Jelly

 
Have you ever tried home canning?  I know that the sound of it sounds a little intimidating.  I was also in that boat.  I have yet to try the pressure cooker method. (Bad memories of a small incident as a child).  To start I think you need to start easy and grape jelly is a great place to begin.  It requires few ingredients, but with tasty results. To can grape jelly, you need a water bath.  I found mine on a great sale at the grocery store with all the accessories you need.

Pin It Now!

Friday, April 6, 2012

Refinished Table

After a constant nagging for 4 or more years (I've sort of lost count), my hubby decided to tackle a refinishing project.   I intended to help, but it just didn't work out.  I thought I would share what a great job he did.

Pin It Now!

Sunday, April 1, 2012

April Fool's Chicken Pot Pie

At out house April Fool's has always been a special day for the munchkins.  As they get older, it is a lot harder to trick them.  I looked up April Fool's food on the Internet.  In years past, I have tricked them with mashed potato and fake spaghetti  cupcakes . This year the Family Fun website caught my eye with their Chicken Not-Pie.  So, I thought I would try it out.  For the not-pie you need,

  • 1 aluminum pie tin
  • 1 pie crust
  • 1 (3.4-ounce) box instant vanilla or white-chocolate pudding
  • 3 yellow and  orange Starburst candies
  • 1 green Chewy Jolly Rancher candy or green Tootsie Roll candy
  • 1 to 2 dried apple rings or just dried apple pieces 


The Family Fun Recipe is a little different than what I ended up doing.  I first tried the refrigerated pie dough.  It was a complete flop and the dog ended up eating it.  I took a homemade pie crust that my sis had, (Thank goodness) and a 9" aluminum pie pan.  I then flipped the pie tin over so I was looking at the bottom.  I tore a piece of aluminum foil and covered the bottom of the pie tin, then I laid the rolled pie dough on the foil.  I finished the pie crust with the fork around the bottom edge and poked a couple holes in the crust. Then I put it in the oven for 8 minutes.  While the crust was cooking, I cut the orange and yellow Starburst into squares. (carrots and corn) Then on to the peas, just cut the green candy into about 5 pieces and then roll them.  I had dried apple pieces and I ripped them to give them a chicken pieces look.   After the crust was finished, I just removed the pie crust from the pie pan by lifting up the foil.  I then allowed the pan to cool and then I made the pudding and added the Not-Veggies and put it in the cooled pie pan.  After the pudding had spent it time in the refrigerator, I added the pie crust lid.  I fooled a couple of the munchkins, but some of them are catching on to my ways.

Did you play a fun harmless April Fool's joke?
Pin It Now!